Monday, May 11, 2015

Pretty Little Pockets Tutorial using Gelli® Prints

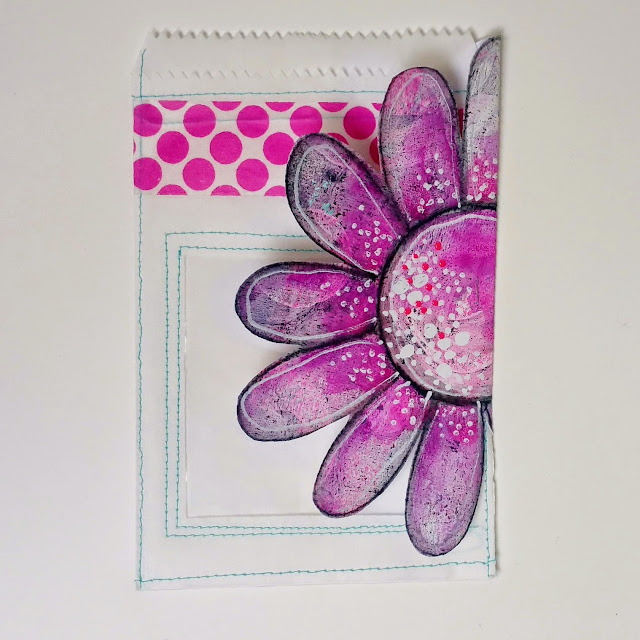
I have a little tutorial for you today! Want to make these pretty little pockets? If you're at all like me and have a Gelli®-plate, you have stacks of gorgeous prints, and you need ways to use them! How about some flower toppers for sheer white envelopes? 


I also made a big pile of pockets with recycled kraft-colored envelopes. Any color of envelope would be pretty!

Once you start making these, you just might not want to stop! :)


Yes, see that round blue thing in the photo above? It's the round 6" Gelli®-plate. I love it in all it's stained glory! ;)
You will need:

- sewing machine
- black (or any other color you wish) sewing thread (make sure the bobbin has black thread too. Teehee. I made the mistake and totally forgot about that part with the first pocket I made.)
- white glassine envelopes (the ones I used are 3 1/2 x 7 3/4 inches in size) Found them in the cake decorating section of Michaels.
- acetate/transparency
- ruler
- trimmer
- scissors
- various Gelli®-prints - some of them had defined lines, and others were busier. It doesn't really matter. They end up pretty no matter what type of prints you choose, I think! Do you have no idea what Gelli® prints are?!? Oh my goodness! Do check out my other posts about it, or check out the Gelli®Arts website!  
- Bic white-out pen (The white Signo Uni-ball would work too.)
- irRESISTable Pico Embellishers in Neon Orange and Neon Pink (or puff paint)
- washi tape
- Neocolors2 wax water-soluable crayons
- black Stabilo All pencil
- waterbrush or a plain brush
- Gelatos
- paper doilies (I used a set from the cake decorating supply section at Michaels.)
- glue dots or some other adhesive (a simple glue stick works too) or a stapler
- fine line markers (optional)
- flowers template (optional) Download template HERE

Envelopes:

1. Cut transparency/acetate into a 4 inch square. If you have different sized envelopes, just measure accordingly, leaving a border all around for the stitching.

2. With an envelope opener (or knife or scissors), cut open two edges of the glassine envelope. Open and lay flat.

3. Mark out a 3 1/2 inch square with pencil on the front of the envelope lightly, making sure it's mostly centered. Cut out the opening with scissors.

4. Take the acetate square, and with a small bit of washi tape, secure it to the back of the envelope, covering up the window, making sure you leave enough overlapping all around so that you can sew it to the envelope.

5. With sewing machine, sew around all the edges of the window, as shown in the photos. On some of them, I stitched double rows, and others I did not. Remove the washi tape.

6. Close the envelope up, and sew closed around the two sides and bottom.

Flowers:


1. I have included a template you can download for free if you don't want to freehand the flowers. Click on photo for this safe download. Once downloaded, print it off, then cut out the flowers to use as a template.

Sorry about the blue corner lower left. Not sure how that came to be there. LOL

1. Select a few Gelli®-prints, Choose based on color. Intricate patterns or a simple circle pattern are lovely too. You might want to experiment a little, to see what you like the best.


2. Place the flowers on a Gelli® print, trace around the flowers with the black Stabilo All pencil.

Alternately, if you don't want to use the template, with the black Stabilo All, freehand a circle directly on the prints, then petals all around,


I don't worry too much about evenly sized petals. Just wing it. ;)

3. Wet the lines with a waterbrush or just a normal paint brush. Let dry.


4. With a coordinating NeoColors2 crayon, add some color to the middle and on one edge of each petal.


5. Wet with brush and blend. Let dry. (Partially at least. I'm often too impatient...)


6. Add three different colors of Gelatos to the petals and middle. I used colors Bubble Gum, Passion Fruit and Lavender. For a contrasting look, add a different color to the base of each petal. (Which I've done on other flowers, but not this one.)  Let dry (mostly).


I added the two colors in similar areas, close to the base of each petal, blending outward with more water to eliminate hard lines as best as I could.


7. Add the same lines as the black ones with the white-put pen, messily following the lines of the black pencil. But don't sweat it. You don't want the white lines exactly where the black lines are. Carelessly is key here! LOL


I added small dots in the middle, along with a few larger ones. I find them so cute!

8. With the Pico Embellisher, add dots to the middles and the petals. See photos for placement. Let dry.


9. Cut out each flower with the scissors.

10. Attach to envelope with glue dots or staple to pockets. On some of them, I folded the flower in two, and tucked the back half into the front of the envelope. On others, I added a paper doily behind the flower first.Add some washi tape, and maybe some more of that Pico Embellisher around the window. I doodled with a marker on a few of them.


And there you have it! Now find some goodies to fill the little pocket, and send to an artist friend! Or add it to your next art journaling page! :)

With these flower pockets, I used pink and turquoise sewing thread instead of black.

Thanks for stopping by!

Anna

May 9 DLP Challenge: Stitches

This week's DLP challenge is one of my favorites so far: stitching. Well, close behind the Gelli®-printing one, actually. :)

Haven't heard of these DLP challenges? The project is called The Documented Life Project. Every week you get a journal prompt and an art prompt, with monthly themes. It's great for the beginner and the more advanced art journaler. Tons of support on the Academy and on the FB group! It's a wonderful community and place to be! Totally FREE to join!
It's the brainchild of four beautiful artists. Check out their blogs here:

 Sandi Keene,
Lorraine Bell
Roben-Marie Smith
Rae Missigman

Each week they share their take on the challenges.
Check out The Documented Life Project 2015 - The Journal here.

Anyway, back to my page.

I have been busy making little happy mail pockets with my sewing machine, so when I read the May 9th challenge: stitching, I was thrilled!

It all started with this gorgeous Gelli®-print I could not bring myself to use, as I liked all the little details on it so much. I didn't want to cover any of it. Then I started getting ideas on how to use it.

The print was mostly made by removing the paints from the brayer while Gelli®-printing. In addition, I learned how lovely the effect of brayering on top of the stencil on the Gelli® plate. So, lots of that on the background as well. I also added some stamping by covering the plate with paint, then stamping  on to the plate, then the background. Rae Missigman's stamps are so gorgeous, and I was so pleased with how the flowers looked against the other colors and patterns.


For the left side of the page, I attached flowers, and on the right -  an Audrey Hepburn quote.

Audrey Hepburn is brilliant, isn't she?

For BEAUTIFUL eyes, look for the GOOD in others.
For BEAUTIFUL lips, speak only words of KINDNESS
and for POISE, walk with the knowledge that you're never alone. 


For the flower: I freehanded the outline of each flower with my trusty black Stabilo All pencil, wet it,  and once it's almost dry, I added more freehand petals with the Bic white-out pen. I say "almost" because I didn't have the patience to wait until completely dry. LOL Then, I added some more color to the petals with Neocolors2 crayons and Gelatos. Next, I stitched around the circle, up the petals and back and forth in the flower middle. For the little dots, neon pink irRESISTable Pico Embellisher. These work so quickly and easily! I want every color! Scroll further down for a link to the product; if you want to know what I'm talking about. :) 

To make those pink circles with the white dots, I simply took a Stabilo All pencil and brought the existing circles forward from the background, adding white with a Bic white-out marker. (Next time I should take a photo of the Gelli®-print before I made changes, like a before and after.) 

The white harlequin texture is modeling paste, smoothed through a stencil. YUMMY! 


For those cute pink stitched circles, I sewed a grid on a piece of pink painted paper, and cut out circles, attaching to the page in a pleasing formation. ;) The purple flower has pink dots, right? They are made with a most darlingest of new art supply in my every-growing supply stash! They're called irRESISTable Pico embellishers.  This product creates sweet 3D texture.


Another close-up of the stitched circles and the modeling paste. Yum.


For the lettering, I used an old Ki Memories alpha stamp set, using a foam brush to apply the white acrylic paint to the letters. The smaller lettering is simply freehanding with a Bic white-out marker. It's my favorite new white "paint pen".

And there you have it. My Stitches challenge. :)


Friday, May 1, 2015

Happy Mail Fun


Been busy making happy mail for some art journalers that is seriously overdue! Stealing moments to do this. 15 minutes here and there. My kitchen table has barely been recognizable this past week, as it's full of the yummy artsy goodies all over the place. Hubby's working very late most nights this week, so I figured it's a good time to do it. :)


Top left: making 12 sets of numbers from 1 to 31, identical to the ones I use in my DLP project.


An index card prepped with clear gesso gave the paper extra tooth for the paint to grab on to, and wow, loved the results! I used pencil crayons, Neocolor 2 crayons and Inktense pencils, then added smaller details with a black fine-line Sharpie and white with the Uniball Signo white gel pen.


Here, I re-created my 2014 DLP journal cover. That was fun!


Completely deviating from my usual color palette! The last few weeks I have made a huge pile of Gelli-prints. The background of this one is one of them. I really loved how the excess paint created an interesting texture. I added a chevron mask to the plate before I pulled a print. Next I added dimension with a black Stabilo All pencil, and added some stamped flowers using my own hand-carved stamps. Then added more details with a Bic White-out pen, a fountain pen and other fun details, including modeling paste through a stencil, then adding shine with Inka Gold paste. FUN FUN!

This was a really quick doodle, not spending any time thinking through things. I kinda like it! I started with an old print using Dylusions ink sprays through a stencil. I added doodles with fountain pen, a black Stabilo All watercolor pencil and the Bic White-out pen.


Hope will fall like rain. Isn't that great? It's a line from Toby Mac's Speak Life song. It's my favorite inspirational song ever. I included those lines in an illegible way in the background of my watercolor bubbles, seen on the right of above photo. The flower on the left is a hand-carved stamp, with many added doodles on top. Sequins make anything look prettier, right? Oh, and the best for last: the kraft envelope: it's a recycled bag from my friend's scrapbook store. I cut the bag into four, sewed the edges, added deckled edges where it needed it, added washi tape, and glued down my flower. :) 

Just had to share, as it's so fun to do. :)
Happy creating!
Anna