

A friendly hello to all of you!
I'm participating in a fantastically fun blog hop with StencilGirl and Amazing Casting Products! See below to see what I made and how you can win goodies!


Never heard of Amazing Casting Products? Well...I didn't know much either, and so when I set out to create something of the goodies I received in the mail, I went on an adventure to learn what it is! So many stunning ways out there to tickle your creative bone, and the eye candy, wow!
So, I received Molding Putty, see HERE
and
Alumilite White Resin, see HERE.
I thought of making jewelry, which is a popular thing to make with casting products, but I have very little experience with that, so I stuck with what I am familiar with: 3D embellishments.
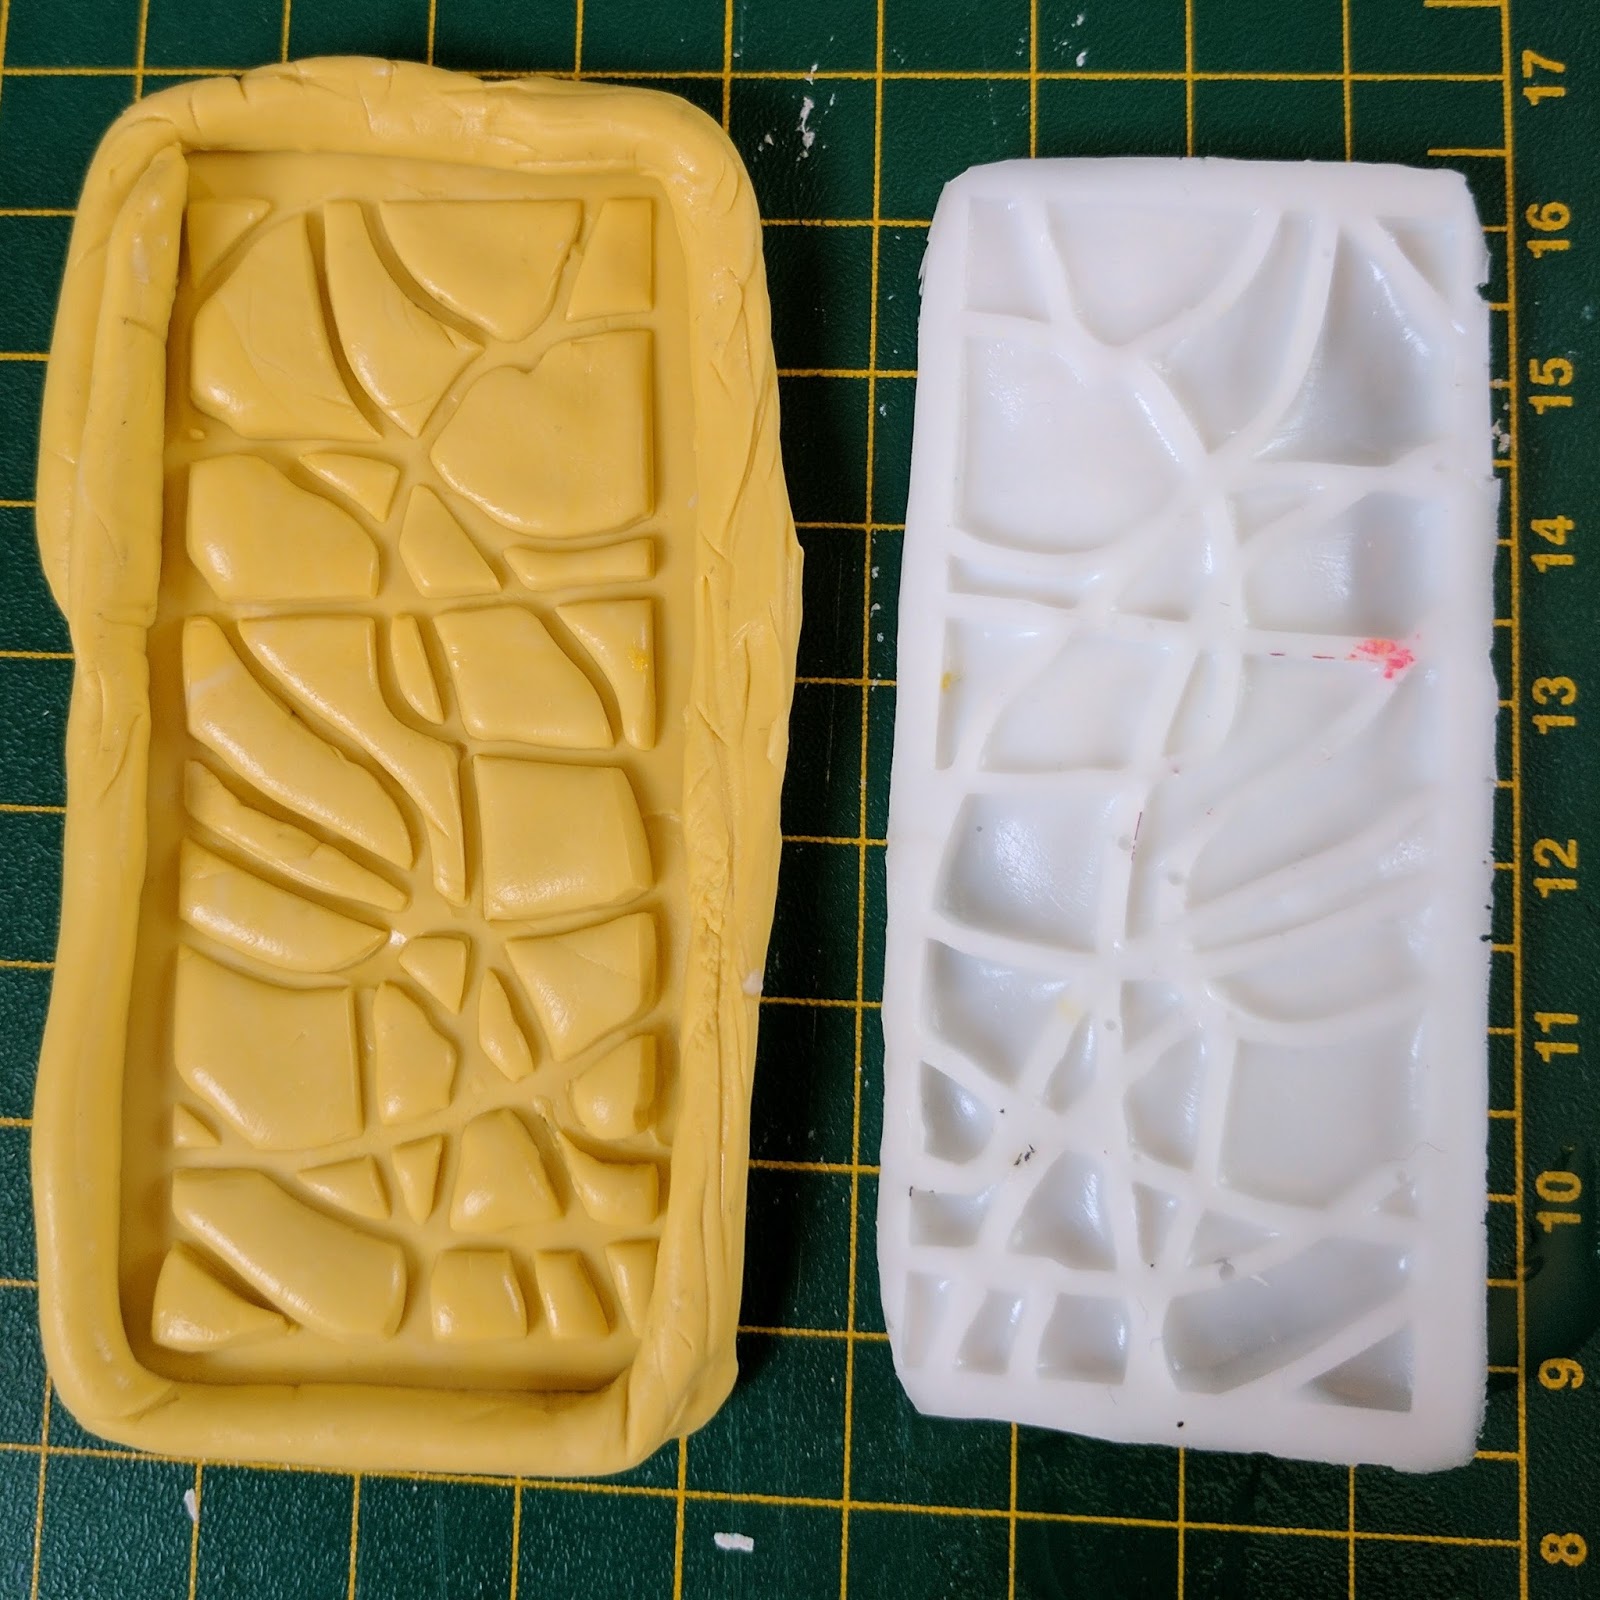
The first thing I did was start playing with the molding putty, looking for things in my house that would create an interesting mold. I found success with a necklace. See below.


It was a little tricky prying out the finely detailed parts, and I ended up tearing a bit of the mold. Take it really slow when you pull out the original piece.


I had to patch the underside, as I pressed the original into the putty too hard, piercing the putty through.

The instructions come with the packaging, and the steps are very simple. So pictured above: I poured the resin into the mold. In 20 minutes, it is ready to be taken out. Fast results, people, making this ideal for those of you who don't want to wait a day to see. :)

I cut up the piece into smaller bits. The resin is quite flexible while it is warm. It cuts great when it is thoroughly cooled down, as long as you haven't made the it too thick.
Then I tried different stencils, and loving the results of this one, so I made several of them. I used one of the rectangular shapes from the April 2016 Private Collection 16.2

Painted the piece with black chalkboard paint, let it dry, then added a few layers of a pink from the Silks line by ColorArte. Love the sheen it gives!

I seared a hole for the ribbon with my woodburning tool. Works like a charm.

I made a few casts from this mold, trying different looks.

Now on to my art journal page! I had previously painted the background of this page in my junque journal that houses the Art Marks 20 Day Challenge.
I tried to transfer some laser-printed images to my page, but didn't have much success, so I just glued the photos to the page with matte medium. They've got that grunge look to them from trying to transfer them, so I'll go with that! ;)

With the Travel Note Mini, I add texture to some of the coloured areas of the two page layout.


I add some detail with a fun circular-shaped stencil from the Cathy Nichols Boho Collection.

I really want this looking even more grungy, so I splatter some ink and make it run down and across the page.


Add in black spots with another little stencil from the April 2016 Private Collection 16.2.

Circled black spots with black pen, and added paint to the resin chevron pieces.
One of the pieces, I painted with black chalk paint, and then the metallic Silks on top, which gives it some bling. ♥
Glued resin pieces to page with a hot glue gun. I also glued the ribbon in place and a silver metal leaf from a discarded necklace.

"Be Intentional" is my phrase for 2017.
I dyed the silk ribbon with Dylusions sprays.
And there it is! A completely new way for me to add decoration to my art journaling pages: 3D resin. I am now addicted!


Thanks for stopping by, fellow creatives! I've had a lot of fun with creating my own resin casts. Stencils are a such an easy way to add textures and patterns YOUR way to your art!
See below for info on how to win these products and to see how other my fellow StencilGirl Creative Team members and other artists use these products together!
♥♥♥ Anna ♥♥♥

GIVEAWAY
One lucky winner will receive both a $25 Gift Certificate to StencilGirl Products
AND a $25 Gift Certificate to Amazing Casting Products!
AND a $25 Gift Certificate to Amazing Casting Products!
Visit the fabulous designers from both teams and comment for your
chance to win!
chance to win!
The more blogs you comment on, the more chances you have to WIN!
(One comment per blog please.)
(One comment per blog please.)
You have until Sunday, April 23rd at 11:59PM Central Time to leave your comments.
Winner will be announced on
StencilGirl's Facebook page and Amazing Casting Products’s Facebook page
StencilGirl's Facebook page and Amazing Casting Products’s Facebook page
on Monday, April 24th.
Your page really pops with dimension!
ReplyDeleteThis comment has been removed by the author.
DeleteThanks, Jill!!
DeleteThat is so freaking cool - total eye candy with those colors! I can't wait to get this product to start making stuff!
ReplyDeleteThis comment has been removed by the author.
DeleteI appreciate your comment, thanks! :)
DeleteWow, those products look like fun to use! I love that they dry fast and you don't have to wait o long, who can wait?? Love the results you got. Like your cool page layout. thanks for sharing.
ReplyDelete~Gin K.~
Yep, this was a lot of fun. Thanks for visiting!
DeleteBeautiful journal spread! And I love the pieces you created!
ReplyDeleteJackie ")
Thank you, Jackie!!
DeleteI love your colors and mark-making, Anna! So cool the way the rectangular shape from the April 2016 Private Collection 16.2 turned out! Gorgeous journal spread!
ReplyDeleteThanks, Mary! I think this club stencil set is my favourite! I ways find reasons to use it!
DeleteLove the style you demonstrated here. Great use and combining of products. Your design work is impecable.
ReplyDeleteI appreciate it, Mary! ❤️
DeleteAmazing! Love the dimenionality of your pages!
ReplyDelete:) :)
DeleteI'm a first time visitor to your blog and now I'm a subscriber!! I'm looking forward to more of your amazing and inspirational work!!
ReplyDeleteOh wow, Cynthia! That makes me happy, thank you! ❤️❤️
DeleteBeautiful!...the more I see, the more I want to try!
ReplyDeleteGreat to hear! :) So many great ideas on this hop! If only we had more hours in a day, right? ��
DeleteI had no idea you could do this kind of thing! Love your project!
ReplyDeleteYes, resin casting was new to me too! Love it! :)
DeleteWhat an interesting technique and products. I'll need to get some of those.
ReplyDeleteThanks, Debby!
Deletevery creative project, love all the mediums you used. the amazing casting products are addictive, I sometimes carry some in my purse cause you never know when you'll find something interesting to mold. really love the way you used the jewelry mold and the stencil mold. great job.
ReplyDeleteHaha, Maria, you are hilarious! I love your mind! :)
Deletethis sounds like some sun stuff.
ReplyDeleteI like to try new techniques and
when they make such pretty things
I can resist.
Love your project.
thanks for sharing.
txmlhl(at)yahoo(dot)com
Glad you came to visit! )
DeleteI love this, it's beautiful and cheery.
ReplyDeleteThanks so much, Christy!
DeleteSo cool!
ReplyDelete:) :) :)
DeleteI love this grungy page and your creative resin embellishments!! garciacoach (at)gmail (dot)com
ReplyDeleteI was thrilled to add 3D texture this way! Thanks! :)
DeleteI'm such a fan of your art journal pages! Dee-Lish! and loved how you incorporated your resin pieces!
ReplyDeleteTina, you're da bestest!! Hugs!!
DeleteBeautiful 3D resin piece. Would love to use it as a stamp!
ReplyDelete(Annie)
Great plan, Annie!! :)
DeleteWOW! This is REALLY amazing! LOVE the tutorial and info!
ReplyDeleteThank you very much, Mischelle!
DeleteI love your work. First time I've been here and now you are on my favorites list.
ReplyDeleteAwww, thanks so much, Joyce!! Glad you're here! :)
DeleteEnthusiastic words written in this blog helped me to enhance my skills as well as helped me to know how I can help myself on my own. I am really glad to come at this platform.
ReplyDeleteยาง ซิ ลิ โคน