Showing posts with label documentedlife. Show all posts

Wednesday, April 6, 2016

April unPlanner Pages Part 01

Hi everyone! I'm back again with another unPlanner post. Can you tell I'm seriously in love with this project? Thanks so much to Rae Missigman, Lorraine Bell and Sandi Keene! Check out the details HERE. ♥♥♥

I started a new binder, as the first one is completely full!

I choose happy, summery colors of summery for April. I might be rushing summer a bit here, but it's what I need to do. I'm sure all you northerners understand, correct? ;)

April divider is a card I had made some time ago, using gelliprints, and I call it a paper quilt.
I added a white cardstock half circle, wrote out the month with my Zig Clean Color Waterbrush markers.Stitching in black all around, of course. ;)
This is the front of the watercolour calendar tip-in.


Calendar all ready to fill in with fun doodles. I'm loving it so much!!


For the reinforcement spine: if you have followed my blog the last two years, you might have seen my watercolour bubbles tutorial. I used my April colors, and instead of using watercolor pencils, I just used those Zig markers. I simply painted circles, and outlined them with a fine-line Sharpie marker in black. I stitched in black again, of course.


Week 14 PAC done. Again, revisiting my 2014 DLP design. The words scribbled onto the watercolour paper are the lyrics to a song very dear to me: Speak Life by Toby Mac. See that design HERE. I added two designs of orange ribbon to add interest, and I cut out one of the yellow bubbles in my design for the reinforcement hole. I love it! 


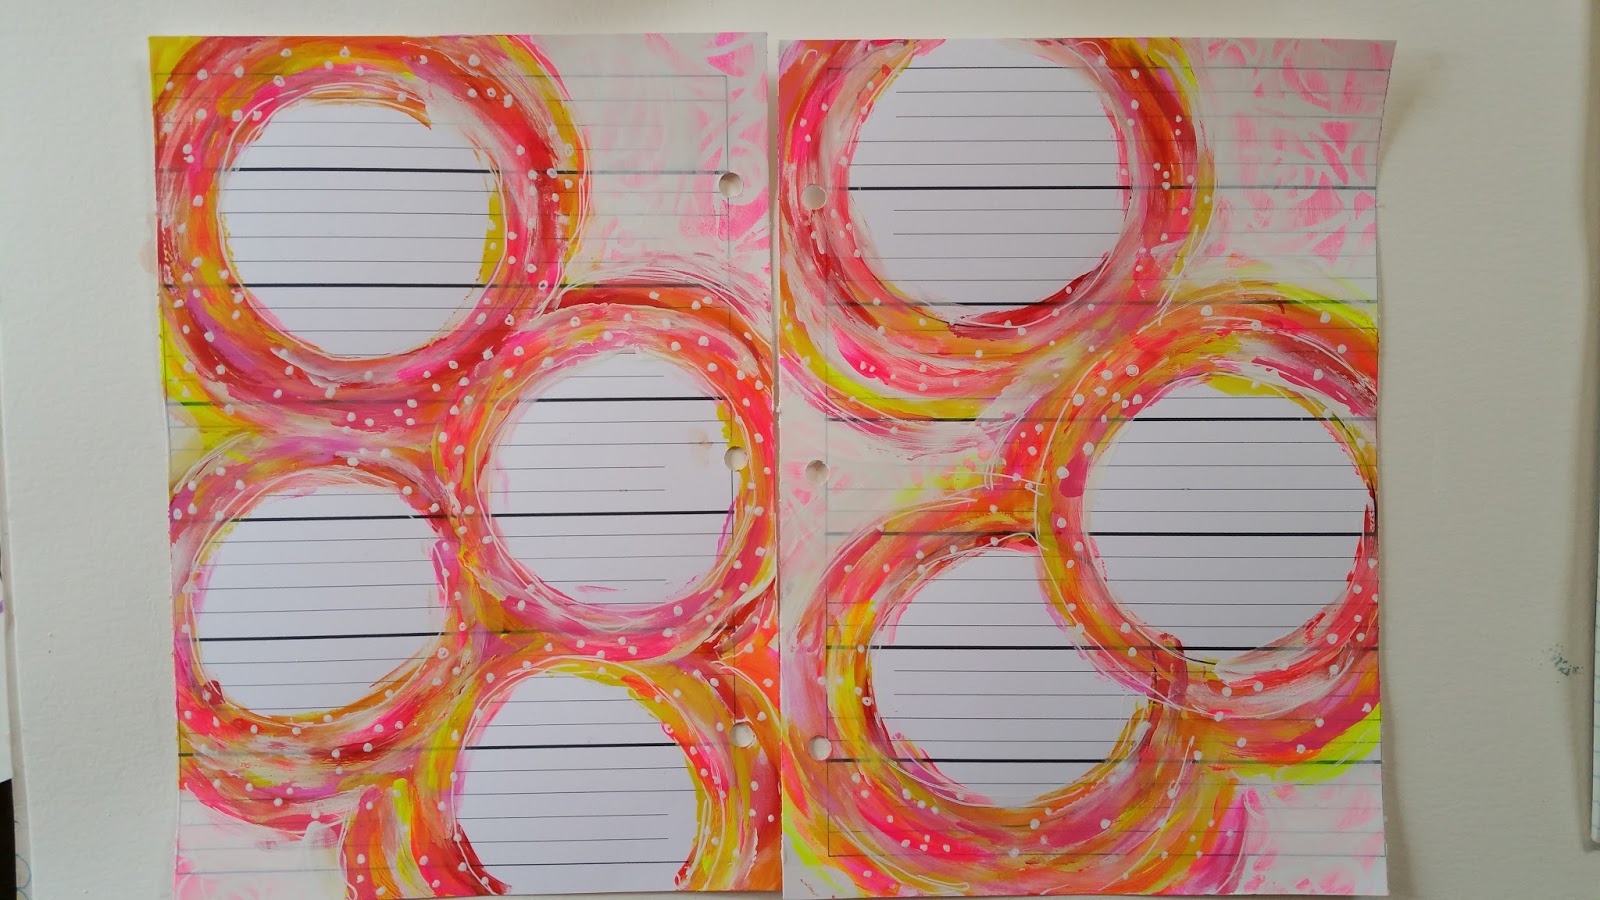
For April 1 and 2, I have these lovely circles on a white cardstock, which I printed the weekly view download on, the download that comes with the project. To see how I made these pages, I created a fun tutorial. It's right HERE

Yellow bubbles for the reinforcement spine. :)


To house the PACs, I again altered the pocket pages to fit. Black stitching...

Close-up are always good, right? Here they are. :)


Pocket for the second PAC is ready to go. 


April 3- 10 ready to be filled in. I can't quite believe how caught up I am!


And we're done for now!

Thanks for visiting!!

♥♥♥  Anna  ♥♥♥

Tuesday, April 5, 2016

Finger Painted Circles Weekly View Tutorial

I'm always looking for a new look for my weekly views in my unPlanner, one that accommodates my journaling spots. I am liking this one very much, so I have decided to give you a step-by-step.

This features:

- An analogous color scheme. I used red, pink, orange and yellow.
-7 circles fit randomly on two pages. My pages are 6"x8".
- Downloads from the Art5 unPlanner kit, but any lined pages would do.
-My watercolor bubbles paper for the reinforcement strips. See HERE for that tutorial.
-Sewing around edges and the reinforcement strips
-Day of the week stamps. I used the ones that come in the Art5 unPlanner kit.


Are you ready? Here goes:

Materials needed:
1.Paints in an analogous color scheme, meaning colors that are beside each other on the color wheel.
2. Lined paper
3. circle template - I used a roll of masking tape. It measures around 4" in diameter.
4. black Sharpie fine-line marker
5. stencil for the background: I used Tim Holtz Scribbles
6.white Uniball Signo gel pen
7. the watercolor bubbles paper
8. sewing machine
9. black thread
10. sponge
11. glue stick
12. paper trimmer
13. black ink pad
14. days of the week stamps - I used Rae Missigman's stamps that came in the unPlanner kit.
15. hole punch to fit for binder
16. hole reinforcements


Step 1: print out the downloads onto cardstock paper.
Step 2 : draw 4 circles on one page, and three on the other in a random way.


Step 3: Started painting circles with your fingers around the black ones you drew in. Use all the colors you picked. Paint with a very light hand, with only a bit of paint on your finger. This way you won't have bold slashes of color. You want each color to be broken up, random on the paper.


Tip: I find the yellow is too strong here, so below, I added more light touches of different colors, to add more dimension.


Keep adding more paint until you have a nice blend and coverage of painty circles. I like lots of variation of color for my circles. Let dry completely.


Step 4: With a sponge, add paint through the stencil to the remaining white space around the circles.


Step 5: I found the hot pink competed too much with the painty circles, so I added white paint over it. 
Step 6: Draw random dots with Uniball Signo gel pen on the circles.


Step 7: Draw broken circles on top of the circles, focusing on the inside circle and outer.


Step 8: Stamp the days of the week in the circles.


Step 9: doodle in the numbers with black Sharpie.


Step 10: trim the watercolor bubble paper into 3/4" strips and glue to reinforcement spines on both pages.


Step 11: punch the holes to fit binder.


Step 12: Add white reinforcement stickers to each hole.


Step 13: outline the edges of the reinforcement strips and the circles with the Sharpie.


Step 14: Sew with black thread around each page and the edges of the reinforcement strips.


And you're done! Now you are ready to journal your days! 

If you haven't seen the unPlanner project details, do check out this awesome project HERE

I hope you enjoyed this tutorial. See you another time!

♥♥♥ Anna ♥♥♥

Saturday, April 2, 2016

March unPlanner Flip-through

My remaining March unPlanner pages are complete.

I chose greens and yellow for this month. I did enjoy using all these greens, but I'm looking forward to a more girly combo for April.

I hope to streamline my process more, as I find myself spending too much time on this. 

For more information about this project, check out the Art5 website. It's hosted by some lovely ladies who, every week, share their take on the challenge. It's very low cost, and gives you great downloads and extra perks, and access to the private Facebook page, reserved for all the members. Lots of inspiration there! :)

For the backing, I used various greens (and white) on a sponge to paint through a stencil by Suzi Dennis from Stencil Girl.
Next I made a mask to create the day spots, then I sponged brown paint in, let dry, outlined with a white Uniball Signo gel pen, added the circle dates, painted in with coordinating paint, and done.


Week 11 PAC challenge was to add leaves. Found this in an old dictionary. Glued it to the card, stitched with metallic green, added the reinforcements, added some green marks with paint, found the dictionary definition of LEAF, add a yellow fringe, and done. I'm finding these small pieces of art really easy to do lately, and that makes me happy!


March 20-26, I painted circles in an intuitive style, adding white marks after.


Favorite destinations list was fun to do. :) Graph paper for the words. Graph paper is one of my favorite papers to use lately!


March 27-31. I glued this page to the back of the previous page, to save some time. Wasn't feeling that I needed to add anything extra, so this is how it is. :)


I enjoy the edges, with the ribbon peaking through!


I enjoy seeing different angles of projects. Bear with me. :)


I didn't really do any Monthly Pocket Picks this time, but I did put a beautiful tag from the Lorraine Bell in. I glued it the back of the List10, complete with a patterened paper reinforcement edge to add to binder. I thought of punching holes through the tag, but decided to leave it "unharmed".

Facing page are the remaining PACS, collected in sewn pockets, with a triangle edge, similar to how Rae Missigman does her scalloped sewn edge. 


I sewed the pockets smaller, so that the smaller PACS don't float in the pocket. I like the look! :)


 PAC Week 12: arrows, using a Rae Missigman stamp and lots of stitching again. :)


PAC Week 13: Celebrate white space. I cut out a heart from an empty portion of reinforcement stickers, glued to paper, added paint, sewed around the edge, doodled with black Sharpie, added the little quote, a bit more sewing, DONE. Quick. 


To see the video flip-through of March, go to the link to my Youtube HERE.

I think three months is all I can fit into this binder. Good thing I have another one to fill. I think I'll need four of these great looking kraft binders. Looking forward to decorating the covers yet! 

To see what binders I use, check them out at the Art5 Curated Paper Goods shoppe HERE. Lots more yummy things to look at while you there as well! ;)

Well, have a great day artsy friends!

♥♥♥  Anna  ♥♥♥