Showing posts with label gelliarts. Show all posts

Tuesday, May 24, 2016

May Weeks 3 and 4 in my unPlanner

Back again with more unPlanner pages. I'm starting to think these should all just be art journal pages, instead of a calendar. Not sure I want to write on these!

Go HERE if you want more information or to register for The Documented Life Project 2016: The unPlanner!

Been working like mad on a special project, so my blogging has fallen a bit behind. I'll give you a quick run down of these May pages.

May 15-21


These started as gelliprints. I sat, looking at the designs on the page, wondering how I could add more detail before making journaling spots. Then my mind went to the simplistic artsy flowers I have seen lately on Pinterest and Instagram. Like these designs: Country Flowers by Mia Charro.
I started painting some, and I found that I actually kinda knew how to do this! LOL! 


Lots of accents added with stencils from StencilGirl, namely this amazing set by Mary Beth Shaw!


I added some blending with paint and my fingers too.


Added lots of doodles with black sharpie and white gel pen as well.

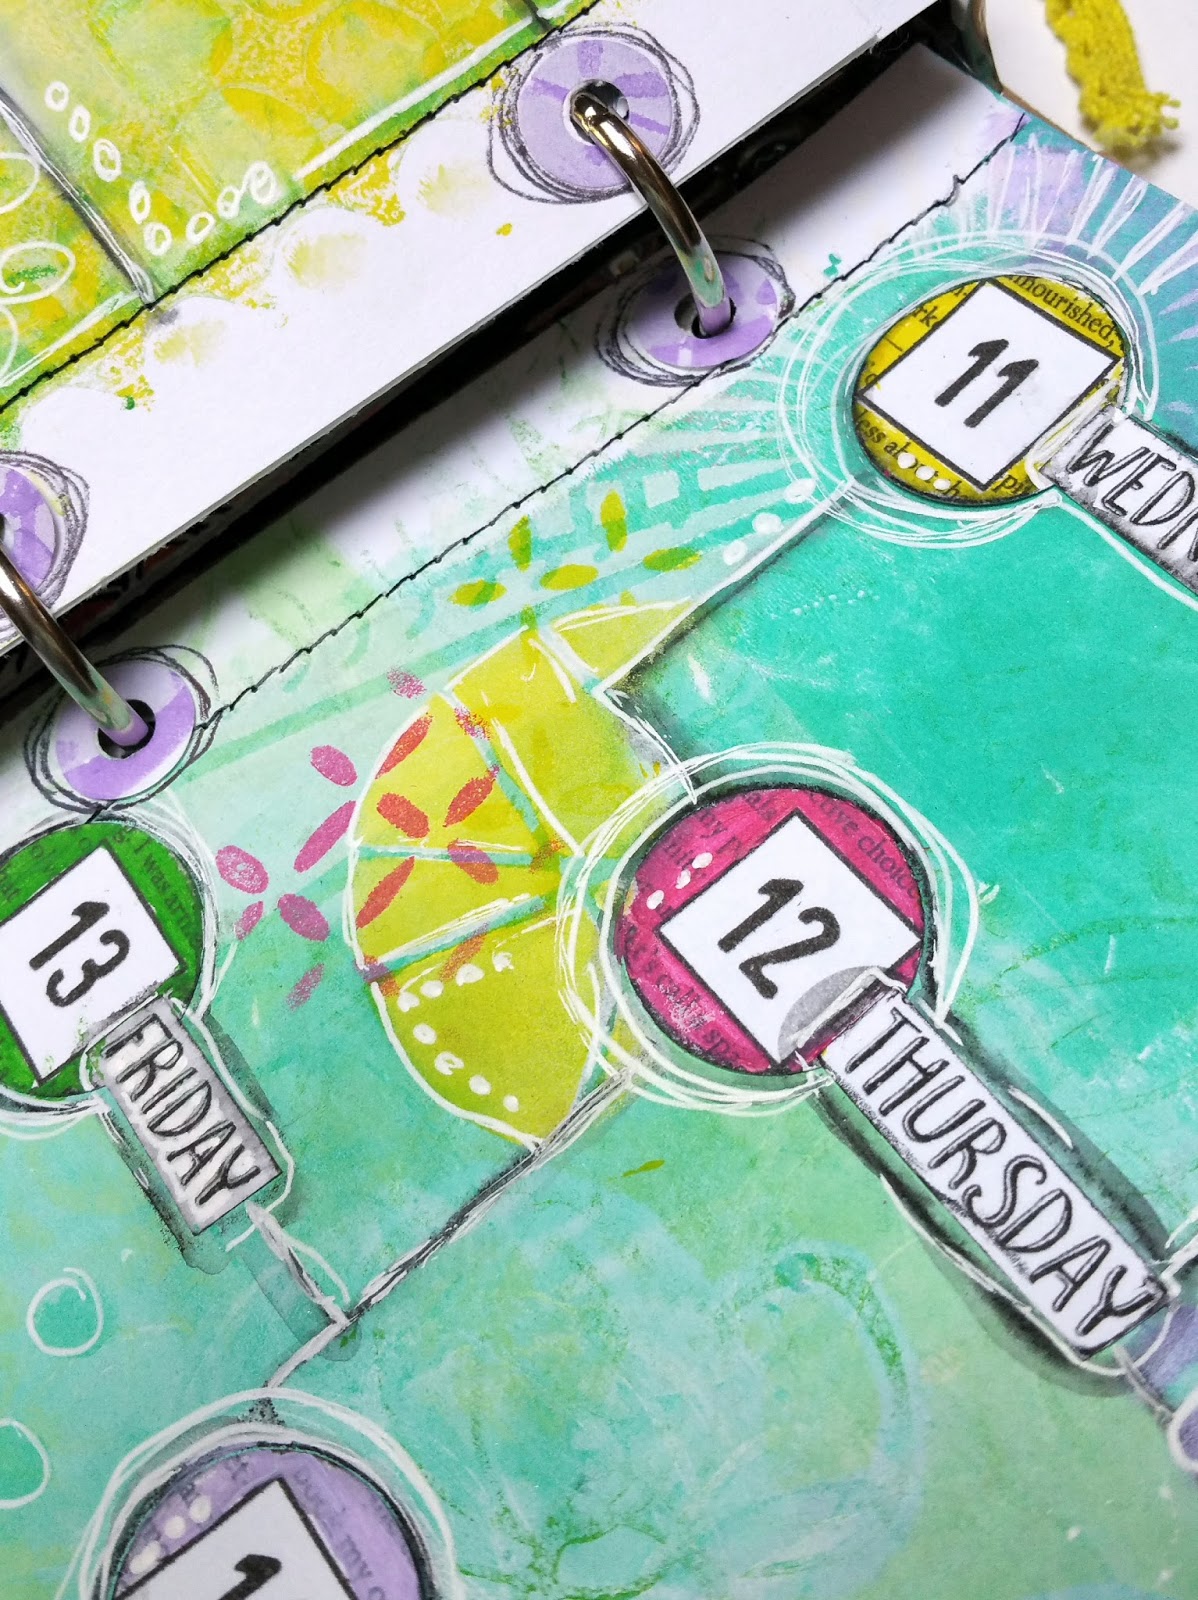
May 22-28


1. I started with two Gelliprints. I used a few stencils for the gelliprinting. Mainly Circles Layer Me by Carolyn Dube and DNA Strands by Mary Beth Shaw.

2. I cut down the papers to fit my binder.
3. To unify the two pages, I pieced a part of the print of the left side to the right page. 

4. I used a handmade flower mask to outline the flower with a black Stabilo All. 

5. I activated the pencil to get a messy look. 

6. I took purple, pink, white and aqua paint and brushed the flower petals and center to add color and layers. 

7. Added some stenciling with a StencilGirl mini stencil to the petals. 


8. Made green circles for "leaves" stemming out from the flower. 

9. Messily scribbled around the flower and doodled circles all over. 

10. Added lines for the days with a black Stabilo All. 

11. Sewed around edges and the lines with black thread. 

12. Added circle days from a printable. 

13. Outlined them with the Stabilo too. 

14. Wrote in the days of the week with a black Pitt pen.


I have a similar tutorial for flowers like these HERE.

And there are two weeks in my unPlanner. I'm a little behind with the challenge part of this project, which I hope to complete next time I post here on the blog. :)\
Thanks so much for visiting!

♥♥♥  Anna  ♥♥♥

Friday, May 13, 2016

May Week Two unPlanner Pages

I'm back again with my unPlanner pages, this time with week two. I just might blog every week if I keep this up! ;)

For more info about this unPlanner project, check out the Art5 website HERE

I kept it simpler this time. Still using the same colors like last week. Same idea as well.


I started with two Gelliprints again, same as last week. My Gelliplate is 8"x10", and I used 8.5"x11" cardstock for the printing, creating a white frame around the print. I took advantage of this and used it as part of my design. I sewed around the edge, following the natural "frame".

I used the same stencils for the gelliprinting as I did in the previous week: the Circles Layer Me and Puddles by StencilGirl.


Next, I added the numbers by Right Brain Planner and days of the week from the Art5 unPlanner Kit.


I outlined and created squares with a black Stabilo All pencil, activating the pencil lines with wet brush. I let it dry. Well, semi-dry. You know how impatient we get...


I painted each date circle with my five colors of paint.


I added stencilling all over the place with StencilGirl stencils.


Layers of stenciling, then added more detail with white gel pen. I first stencilled with gesso, then layered color over the gesso, which helps to make the colors pop more.Makes a big difference, especially for the yellow, as yellow tends to be quite transparent. The purple too.


Left side:


Added gel pen to the black lines and scribbled around the circle dates too.

I painted the white reinforcements with purple, then stencilled with white, purple, white, then purple again.


In the photo below, bottom left corner, there is this fun white design in the background, right? That's the coolest stencil ever. It's called Shattered, designed by Lizzie Mayne.


Here's the right side of the layout:


In top left corner in photo below, is the cool Shattered stencil again.


Had to include a picture of some of the stencils I used. :)


And there it is: Week Two.

For more info about this unPlanner project, check out the Art5 website HERE

In other news, I now have the calendar I use for my unPlanner available to you as a free download. Check that out HERE.

Thanks for stopping by!

♥♥♥  Anna  ♥♥♥

Thursday, May 12, 2016

May, Week One in my unPlanner

Hi, artsy friends! Thanks for stopping by. :)

A new post about my unPlanner, featuring the first few pages.

May has come, and that means a new color scheme in my unPlanner. 

Go HERE if you want more information or to register for The Documented Life Project 2016: The unPlanner!


This Gelliprint is the foundation of all of my pages this month:


The colors I chose came from this inspiration: Lindy's May 2016 Color Challenge. I didn't use any of her products, but I did use the colors in acrylic paint. You can get inspiration anywhere! (I did add pink, as I couldn't leave it out!)  

I went crazy with StencilGirl stencils for the Gelliprint: 


I made about ten different prints in this color scheme, and I used them for my weekly pages.

So here's my calendar. UPDATE: I now have this calendar available to you as a download. Check it out HERE.


A little secret tip: The reason the squiggly squares have thick and thin lines is because after I had drawn in the squares, I painted in the "gutters", and I couldn't stay in the lines. So, to hide the "mistakes" I blacked the areas out with my Sharpie marker. This "OOPS" turned out nice, I think!! :)

For the first week's doodles on my calendar, I used StencilGirl stencils again. Sorry for always mentioning these stencils.....naw...#sorrynotsorry. ;)


The tag? Mmmm...an oldie that needed a home, and it's finally not orphaned any longer. I brushed a Rae Missigman stamp with Zig Clean Color watercolor markers, spritzed the stamp with water, then stamped on watercolor paper. 


For the weekly view, I cut down the Gelliprints and sewed around the edges. 

For this print, I used these stencils:


Next, I printed out the weekly view download from the unPlanner downloads. Then I cut out the day of the week names.

For the circle dates, I used a combination of designs. For the white numbers, I used my own design, I scanned in that first Gelliprint I showed you in this post. (see the first one above). Then I made these cute Gelli dots with a font on my computer in my digital scrapbooking program and created circles, printed them off, and voila! Circle dates! 

To download my circle dates design for your own use, click HERE which is a link to the file in my DropBox. Please be sure to credit me if you use them and share on social media, k? :)

For the square numbers within the book text circle, I downloaded this great art journaling/gluebook resource from Right Brain Planner by Teresa Robinson. Check it out HERE.

Here is the left side. After I glued on all the numbers and dates, I stenciled and smooshed paint around, and added frames for the journaling spots with a black Stabilo All pencil.

 I also added more depth with some outlining of some of the shapes I made with stencils.

The stencils I used are mostly from the April StencilGirl club stencils. They came in a 9x12 sheet, which I cut down. 12 cute little designs on this sheet. I love them all!

I added paint through stencils, added white, then more color. Lots of layers.


Add white gel pen scribbles in areas to add more dimension again. 

Around the stencilled shapes.

Around edges of the journaling strips.

Over the black outlined areas of the circle dates, the reinforcements, etc.

Keep adding details, and you'll be amazed at the depth and interested in brings to your project!

See the white lines around the "diamond" shapes?


And here's the two-page spread.


And I call it done! Next week I hope to make my PAC.


Thanks for visiting. I appreciate comments and questions, letting me know you've been here. :)

♥♥♥  Anna  ♥♥♥


Friday, March 11, 2016

Leaves, Mountains and a Hat in my 18/52 Project

 Hi, fellow creatives! I'm having fun playing along with the 18/52 Journal prompts. This is a free art journaling project hosted by the lovely Miranda Banks at Clare Plantation. Check it out here!  

You pick 18 supplies and create one page a week using only 18 items of your choosing for three months. After the three months are over, you select another 18, and use only those for another three months. You do this two more times, until you have 52 pages over the course of the whole year. So fun!

So I've completed eight of the prompts. Today I'm sharing number 6, 7 and 8. I blogged the first 5 early February. See that post HERE.

I'm still going strong with my "Aubergine" color series. Not tired of the colors yet!


Week 6 prompt was LEAVES. I was inspired by an illustration by Eloise Ranouf called Leaf Blocks.

I loaded up my round 6" Gelli Plate with paint in my color palette: deep violet, hot pink and black. I also added white gesso. Using the two stencils from my kit, I made several layers on a paper from my junque journal (an old Reader's Digest book). Then I doodled the leaves with the white Uniball Signo pen, cut them out in rounded rectangles and glued them onto a painterly background in my unPlanner. 


For Week 7, the prompt was MOUNTAINS. I was inspired by a woven rug I found on Pinterest. I adore all those colors mixed with each other, so I went to work finger painting. So fun. I painted many layers, waiting things to partially dry in between layers, but sometimes not, allowing the colors to blend. See the rug that gave me the idea HERE. I just used the paint and gesso for this page. These diamonds/squares on an angle/triangular peaks are what I call mountains. LOL I am allowed to use this prompt very loosely, I think. That's the beauty of art journaling prompts: I will not get tested or graded on how I do this. 


Here it is in my unPlanner.


Week 8, the Prompt was HAT. I was looking for a creative way to use this stencil.


It's this stencil, nicely "loaded" with the paint! I found the quote in the old Reader's Digest book I use as an art journal.

The stencil brought an image to mind of a lady with flowers piled high on her head, and lo, the quote! I happened upon it quite by accident, leafing through my old book! It goes perfectly!! Looking some more through the book, I found an image of a lady to use. She's sad. Must be the flowers weighing her down. I cut her out, and glued it to a page in my unPlanner. Next I placed down the stencil, using the palette knife to add the 3D Gel medium through the stencil, randomly adding the gel through the stencil in a "hat" shape. I let it dry, then started adding color. The flowers didn't look "flowery" enough, so I hand painted some flowers and leaves too. I added more details with the white gel pen, I kept on adding more paint to the background. Loving the textures!!

I blotted out a few words from the little quote with black paint, then adding the right wording with the gel pen.

And there she is!

Next three prompts I need to do are STAMP, FOREST and MOON. Maybe you'll see a post about them soon. :)

Thanks for visiting!

♥♥♥  Anna  ♥♥♥


Friday, January 8, 2016

Inspiration Wednesday Handmade Journal

Inspiration Wednesday: for years the course has intriqued me. This year, I've decided to jump in. 

I want to share the journal I made for it. I made my own. Why? 'Cause it's fun. And my own. Did I say it's fun yet? It is fun to make your own. 


Of course I can't keep it simple. I have to make my own journal. My previous post was of my Artsydoris, and I still I'm not over that. So, with a slightly different take on the whole thing, I will use my skills learned from the Artsydori workshop, and make a larger one for INSPIRATION WEDNESDAY 2016, hosted by Donna Downey. I've been intrigued with that workshop for many years, but you can only do so much, right? This year I'm jumping in with both feet. So, making my own journal for it.

Here are some details:

-  9"x12" Watercolor paper pad by Canson

- 26 sheets folded in half, which gives me a spread to work on once every two weeks, just like the project is set up.

- 5 signatures in total, 4 signatures have 5 sheets = 20 sheets, 1 signature has 6 sheets = 26 sheets 

Punched holes one inch apart with a dentist tool. (I lost my paper piecer, and for some crazy reason, I found an old dentist tool in my tool stash. Life with boys, I tell you. They like to save anything they find!This time it came in handy for me! ; )

- next step is to sew the signatures together. I added a Ranger tag between each each sheet, Inspiration Journal by Donna Downey style. Pink thread of course. ;)


The signatures, left to their own devices, lol, splay open like this. They will be harnessed soon with mixed media goodies in them! Can't wait to make a big mess of them. I folded them, and slip them into the elastics of my Dori. So easy.

Next, I fashioned my Artsy Dori. See the workshop here: Junque Art Sudio.


So, with this set-up, I can take out one signature at a time to work on my projects, and once dry, I can slip it, easy peasy back in - Traveler's Notebook-style. 


Here are some of my process pictures:


Underpaper on canvas, sprayed with Tulip fabric paint and a handmade mask, some gesso smudges, and some Gelli printing scraps...


Didn't like the blue middle...


Changed it to purple.

Added white markings and deep purple. Perfect.


Here's the back! Changed the dark colors to more muted tones, to match the front. I'm happy.


Next, is the project!! Here is my Week One project page in progress. Loving the look. Adding bright colors next. 


I'm very eager to learn new art journaling and mixed media techniques! Here goes nothing! :)

 Hopefully you'll see more Inspiration Wednesday posts. I love starting new projects, but find it hard to complete anything! Craft ADD, I tell you!

Have a great day, everyone, and thanks for visiting!

♥♥♥ Anna ♥♥♥