Saturday, June 18, 2016

I Saw With Open Eyes: unPlanner Week 25

Hello again! I'm sharing my latest unPlanner pages today. I get the honour of being the featured member today in The Documented Life Project 2016- The unPlanner. Thanks so much to Rae, Sandi and Lorraine! 

If you don't know what I'm talking about, or your curiousity is peaked, check it out HERE.


This is volume two of the Art5 kraft binder. It is full to bursting!! 


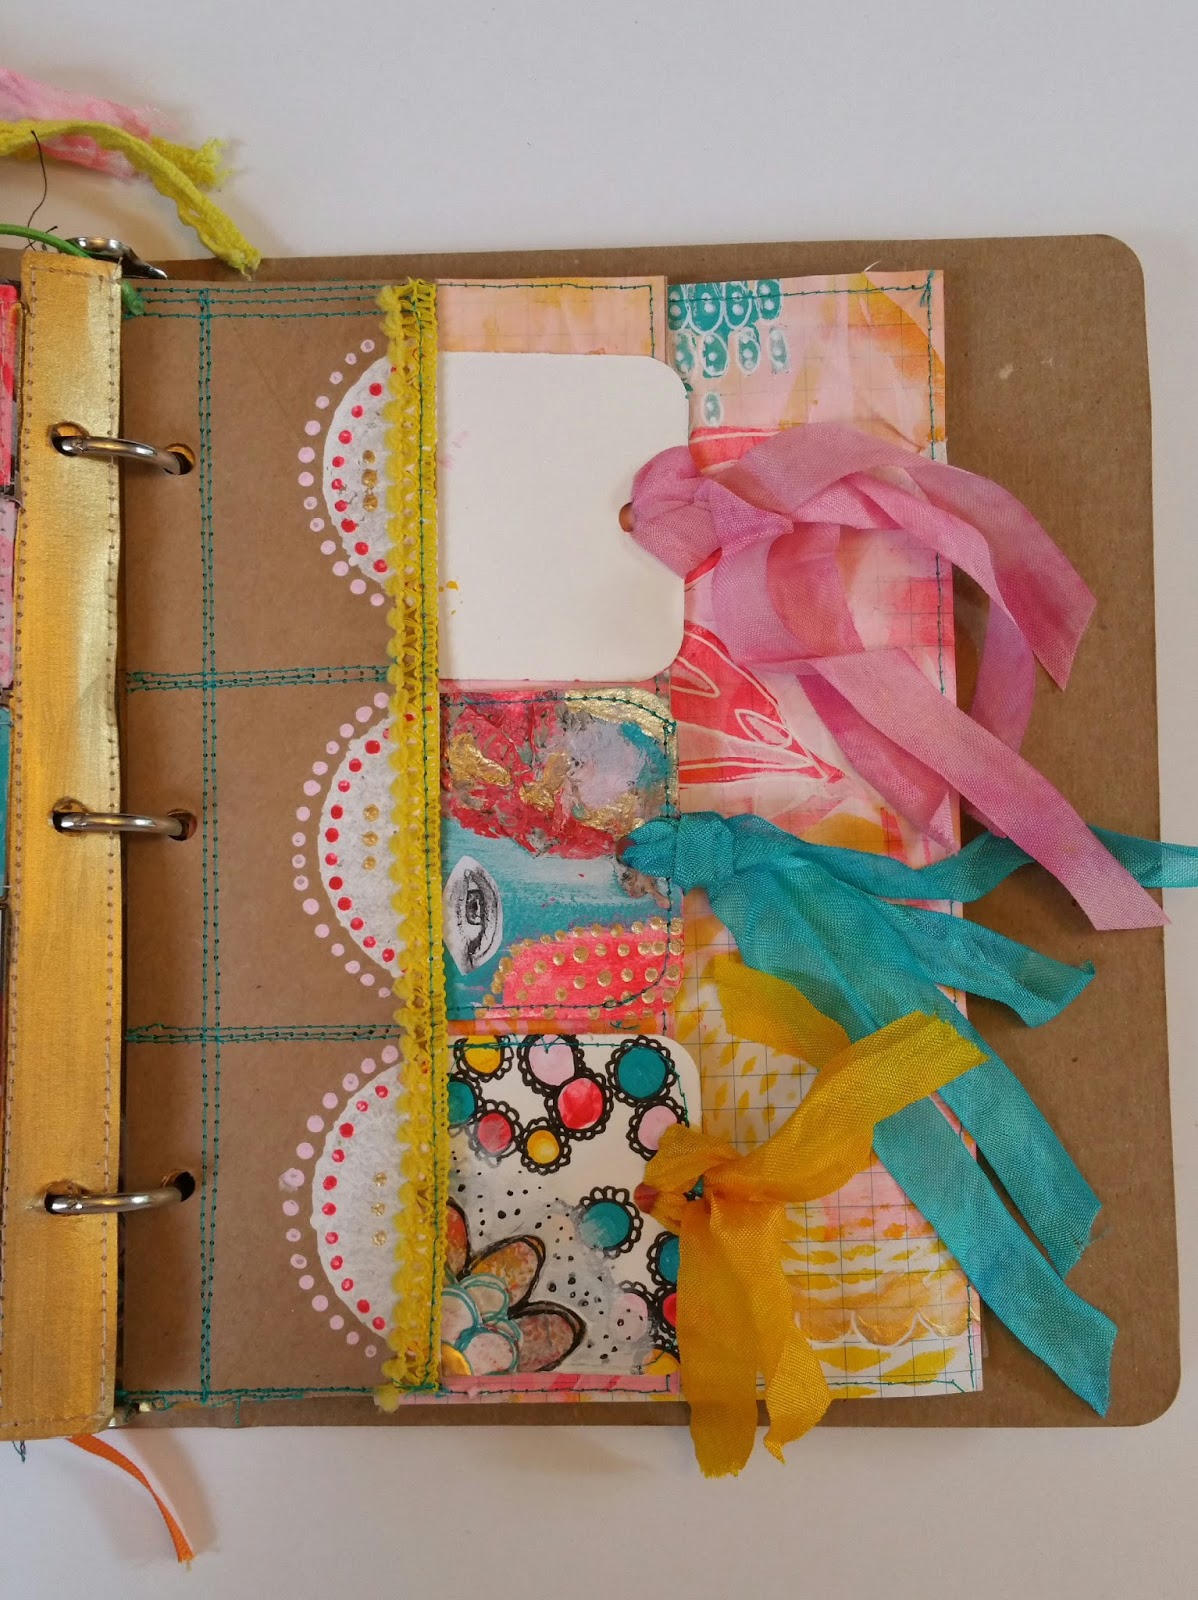
I made a fun tri-pocket to fit the PACs out of a kraft envelope, sewing the compartments and backing it with one of my painted pages.

I used lots of StencilGirl stencils to decorate these papers. I use the same look throughout the month of June. Check out my other blog post about my process. 

I haven't finished a few of the previous weeks PACs, so those will come yet.


This PAC was for Week 24: add doodled flowers. Or ten. 

I used a Brushstix foam applicator with a pointy tip to add the paint dots, then I doodled around each one with a black Pitt marker.
I doodled the larger flower on underpaper and cut it out. A circular blob of gold paint on my underpaper had dried up, so I made that another flower middle, doodling around it, cut it out, then layered it on top of the other cut-out. 
I used Lindy's Stamp Gang spray to colour the silk ribbon I purchased from the Art5 store.
I blended the area away from the large flower with gesso so the flower would be center stage, then added dots with a Pitt marker.


For this week's PAC: use tissue paper. 

I colored the watercolour paper with my June colours.
I used tissue paper with text I found in my happy mail stash (thanks, Lois Stoneking!) for the upper left corner. I smooshed it up with matte medium, glueing it to page. Once dry, I painted it with the same colours. I figure it gives the PAC some good texture.
Next, I added gold dots, cut out an eye from a copy of one of my selfies, glued it to page, and found some phrases in an old book that pertains to eyes and seeing. 
Sewed around tag with metallic turquoise thread.
Dyed the silk ribbon with Lindy's Stamp Gang spray paint.


Opened up, and you see the monthly view. To see my process, see my previous post of my unPlanner.


For these last two weeky views, I used StencilGirl club stencils by Terri Stegmiller. 


This was for the challenge to use a stamp. I used a pool noodle to stamp the white circle, painted pink around with my fingers, pink painted dots, added stenciling with the same stencils I used in the previous pic -  Terri Stegmiller's gorgeous StencilGirl May club stencils in teal, then added white doodles with white gel pen.

Here is a new pic of the pocket with the third PAC completed. So YUMMY!!


This is the back side of the pocket. I will add the List10 tag to that when I get that finished next week.

And that's it for today's post. Thanks for visiting! :)

♥♥♥  Anna  ♥♥♥

Sunday, June 12, 2016

Born With Bones and Heart Fused in Deep


I have started another art journal project. Like DLP, this one also has an amazing community of like-minded artists. Every week you get new prompts. We'll see if I make more than one page! LOL!

Check it out here: www.getmessyartjournal.com

I have wanted to add more meaning to my art and telling stories on my pages for a long time.  Ummm...might my blog name suggest my intentions too, perhaps?  ;) I enjoy creating pretty pages, but often they don't have a story. That's why I got interested in this project. 

The first prompt really stretched me creatively and mentally. Get Messy works on six week seasons, with this season's theme bring introspection. 

The dictionary defines it like this: 


So that's what I'll be trying to do. Communicate thought via art journal pages. Maybe they'll be pretty, but they might not be. ;)

So back to my page I completed. 
I go ahead and do the art prompt, make ink blots, and then it sits, me staring at it for a day.  


What do I see?
I see layers of hearts.
I see two pink hearts on each side. 
I see a white one in middle. 
I see a teal arrow pointing down. 

What am I thinking when I look at those blots?

Layers of hearts make me think of things I feel deeply, but keep a lot of it inside. 
Layers of hearts also make me think of all the friendships I cherish.
The two hearts make me think of my marriage. 
Two hearts combined into one. 
Which makes me think of our center: God the Creator. Jesus. The Holy Spirit. 
The mystery of all this that I can't fathom most of the time, but keeps me on my knees, and always evaluating life from that worldview. 
So the teal shape in the middle represents Christ in me, in us, in my relationship to everything.
As I play, adding textures and paint and words, more things pop into my head. 

Then I start to play, getting MESSY. Just playing. Play. Get messy. Repeat. :)


I cut out a laser copy of a photo of myself, and glue it to the heart on right. Then I paint it over with the same pink, as I want to keep the pink heart shape for the overall look. I don't want my vision to "stop" on the photo of me, as I don't want this to be the center.

I peruse the first poem in the altered book I am using and find neat phrases that speak of looking back through my life, which is what I also want to do in this project.


The poem is called The People, Yes by Carl Sandburg.

I spy a cool stencil lying around of the earth encircled by the planets, a StencilGirl club stencil: 


 and it gives me the idea of Christ as my center in all things, so I stencil with pink paint on the white center heart and the surrounding book page.

Born with bones and heart fused in deep.
 Hugging the little ball of Earth
Mixed from a bowl of sky blue dreams
Shimmering with phantoms
Out of joybells and headaches
mortgages, house rent, groceries
new generations with names
The living flowing breath of the history
Flicker in the mirrors a few moments

Not sure if my newly "found" poem makes any sense, but each phrase speaks to me, as it gives me the feel of my present life as a mom with young kids and of my generally happy past.

The mesh-like texture on the hearts is white paint through a different stencil, symbolizing loosening the grip of my heart on the things that are inside - a cage, so to speak. Does that make sense to you like it does to me? heehee

April 2016 club stencil by Mary Beth Shaw Private Collection 16.2


I see teal-coloured paint on the under paper (deli paper) dried up and it's peeling off the paper, which makes me think of peeling back the layers of my brain and heart. That'll work! I need to add that to my page! So I brush on matte medium in the teal area above and adhere it. This is FUN!!

I add extra layers around each shape with lots of paint. The pink paint is quite transparent, but I want it opaque and heavier, so I add 3D Matte Gel medium by Prima to it, and hand-paint around the hearts, adding white gesso to create more depth of colour.

Lastly I add white dots around each shape with a white paint pen.

As I was blogging this, all the while looking at my page, and after I took the pictures, I decide that the center teal needs to be an arrow, so I go in to add lines in a diagonal fashion with an Imagine Crafts Brushtix chisel tipped sponge. Cool tool!

The arrow symbolizes pointing down, into my heart, and read what is there. See after picture, below.


I'm very pleased with how this all turned out. What a great exercise of INTROSPECTION. :)

And here some shots of my altered book cover in progress. It isn't finished yet!


The coolest product. You blurp it on, then put your heat gun to it, making it puff up. :)

And there you have it. I enjoyed writing this post as much as I did creating the page. :) 

Until next time!

♥♥♥  Anna  ♥♥♥

Tuesday, May 31, 2016

Gold and Pinks in my unPlanner

Hi, all! I'm excited to announce my first post as a member of the design team at StencilGirl! See it HERE

For those of you who have not come from there, go check it out! :)  I share a page in my unPlanner that goes with the one shown below. :)

So, now that you've been over at StencilGirl, check out the next pages I've made.

I will demonstrate how I made these two pages for my unPlanner. One 8.5"x11" sheet of cardstock equals to two pages for my binder, in a flip-out format. 


I start by making a few Gelliprints using the same stencils and four colors of paint and white as I did for the page on my StencilGirl Talk blog post. 

These are the stencils I use:


I look at this design and think that I want the gold lilies to stand out more, so I paint baby pink around the center lily, as the background is meshing too much with the lily. I use the stencil itself to mask off the gold so I can paint more easily.


Next I see that I want a more prominent pink lily on top left corner, so I smoosh paint onto the stencil and lay it top side down on paper to print. It worked!


Next, I add more light pink to the gold one on the right...


Now to the one pink one in the top left corner.


Next, I take the Fibonacci stencil and dab pink through, placing it in three areas on the page, as I like creating visual triangles.


Next, I lay down the arrow, part of the cut-out stencil I masked off, as shown at the StencilGirl blog.


Another one on left side of page.


Next I doodle with a white gel pen to make the teal arrows pop.


Can you see the difference?


Next comes the yellow paint, smudges into background with fingers.


Then my favorite addition: the scallopy shapes with white paint over the yellow through the Half Moon Slant stencil.


And over the pink Fibonacci design on lower left side of page.


See it right on the left edge?


Then I go in with my white gel pen again and trace the shapes and gold paint through the Kilim piece with the flower in random areas.


And I'm finished with decorating the page. 

Next, I paint the weekly download from Arttothe5th unPlanner project, 
cut out each "day", sew to an 8.5" x 11" kraft colored cardstock, 
stencil a few images onto the days, 
add the day numbers, 
print off another tag from the kit, stencil it with the Flicks stencil -light pink on brighter pink, 
sew with blue thread all around, 
adhere the kraft paper to the back of the Gelliprint just demonstrated above ^^^,
punch a hole through the front flip-out part, and string through painted up ribbon.
and add a gold binder ring strip.

VOILA!

The first week of June faces the monthly view flip-out. To get your own frint print-out of my doodley calendar, go HERE.


And this is what it looks like semi-closed: To see my step-out for the page on the left, go to the StencilGirl blog HERE.


My next unPlanner blog post will be close-ups of this next page in my art journal:


If you would like to know more about the unPlanner concept, check out the Art to the 5th Academy!

Thanks so much for visiting!

♥♥♥  Anna  ♥♥♥

T

Tuesday, May 24, 2016

May Weeks 3 and 4 in my unPlanner

Back again with more unPlanner pages. I'm starting to think these should all just be art journal pages, instead of a calendar. Not sure I want to write on these!

Go HERE if you want more information or to register for The Documented Life Project 2016: The unPlanner!

Been working like mad on a special project, so my blogging has fallen a bit behind. I'll give you a quick run down of these May pages.

May 15-21


These started as gelliprints. I sat, looking at the designs on the page, wondering how I could add more detail before making journaling spots. Then my mind went to the simplistic artsy flowers I have seen lately on Pinterest and Instagram. Like these designs: Country Flowers by Mia Charro.
I started painting some, and I found that I actually kinda knew how to do this! LOL! 


Lots of accents added with stencils from StencilGirl, namely this amazing set by Mary Beth Shaw!


I added some blending with paint and my fingers too.


Added lots of doodles with black sharpie and white gel pen as well.

May 22-28


1. I started with two Gelliprints. I used a few stencils for the gelliprinting. Mainly Circles Layer Me by Carolyn Dube and DNA Strands by Mary Beth Shaw.

2. I cut down the papers to fit my binder.
3. To unify the two pages, I pieced a part of the print of the left side to the right page. 

4. I used a handmade flower mask to outline the flower with a black Stabilo All. 

5. I activated the pencil to get a messy look. 

6. I took purple, pink, white and aqua paint and brushed the flower petals and center to add color and layers. 

7. Added some stenciling with a StencilGirl mini stencil to the petals. 


8. Made green circles for "leaves" stemming out from the flower. 

9. Messily scribbled around the flower and doodled circles all over. 

10. Added lines for the days with a black Stabilo All. 

11. Sewed around edges and the lines with black thread. 

12. Added circle days from a printable. 

13. Outlined them with the Stabilo too. 

14. Wrote in the days of the week with a black Pitt pen.


I have a similar tutorial for flowers like these HERE.

And there are two weeks in my unPlanner. I'm a little behind with the challenge part of this project, which I hope to complete next time I post here on the blog. :)\
Thanks so much for visiting!

♥♥♥  Anna  ♥♥♥